Saturday, June 29, 2013

A Castle Wall

A very good friend of mine is involved in her church's Vacation Bible School every June. Her assignment is to read stories (lessons) to preschoolers. The first year that I helped by creating a backdrop, the theme was a ranch and I was asked to paint a horse's head on a poster board. You should be relieved that I don't have a photo of that to share.

A few years back, the theme was Crocodile Dock. I was asked to paint a fishing shack in a bayou, seen here.  Another year I was asked to make snake hand puppets. I saved the prototype which has become one of our grandson's favorite things to play with while here. I don't have a photo of the puppet as originally created, but here is a recent photo of the snake with a pacifier.

This year, the theme was Kingdom Rock. My friend, with an abundance of faith, asked if I would make a castle wall backdrop. With a fireplace. Painted on a flattened refrigerator carton.

Do you know how big a flattened refrigerator carton is? It is huge! Here it is in my living room, painted primer gray.
It was folded and placed flat on the floor to measure and draw pencil lines to indicate where cement blocks would be drawn with a wide tip black marker.
 
I am lucky to have a sewing/craft room, but it isn't big enough to accommodate a project of this size and allow perspective for photographing.
Originally, my friend only wanted three panels done, but once you have a permanent crick in your neck, why not do all four? Here are three panels partially done and the beginnings of the fireplace.
I'm not thrilled with the fire and the glow that I tried to created but I doubt pre-schoolers are picky critics. If they are, I still have a snake that will defend me.
In case you ever find yourself needing to create the illusion of a block wall, here is the cheater's guide:
 
Decide the size of your blocks, in my case, 8" tall by 12" wide. Measure and mark with a pencil on a surface that has been painted the desired color of your wall. My friend and her daughter used primer gray before bringing the cardboard to me.
 
Use a yardstick and a broad tip marker to create the blocks. Take the hard square-ness off of the block corners by making a "Y" on your lines at the top joins and an upside down "Y" at the bottom with your marker. It doesn't have to be exact.
I used disposable foam brushes (I buy them by the bag for messy work) with very little paint (dry brush technique) to make a black line down the left side and across the bottom of each block for shading, then did the opposite sides in white for highlighting. It was a quick detail that gave the blocks some dimension.
 
Next year, I hope the theme is imagination. Close your eyes children. Close them tight. See whatever you want to see while I read you the story of two friends. One wonders how she gets drawn into projects that she feels is over her head.  The other has faith that with a foam brush, acrylic paints and a marker, her friend can make anything she asks.


Thursday, June 27, 2013

Copics on canvas and on ribbon

I am relatively new to Copic Markers but already addicted. My first class was last September. I admitted my addiction here on my other blog. I would probably be further along on the learning curve if I didn't have other crafts competing for Copic time and oh yes...the occasional chores like laundry, housecleaning and cooking interrupt me too.

A class at my local scrapbooking store introduced coloring on something besides paper. We worked on a canvas board and a small muslin gift bag. The instructor had the board and bag stamped and ready for us before class. Both needed to be thoroughly dry before coloring. I believe she recommends overnight drying when fabric is involved. I don't know if the fabric would be washable or not, but for a small gift bag that wouldn't be a concern. I wouldn't plan to decorate clothing with anything but tried and true fabric paint.

Here is the canvas designed to go into a 4x6 frame. The bow and ribbon on the left were supposedly a design element but I would have preferred the stamped image to be centered and skip the ribbon. This particular image wouldn't be my choice anyway, so I doubt it will ever be framed and used.
The muslin gift bags were purchased in bulk from an online source. A square of Copic paper was inside the bag as we colored. For those unfamiliar with Copics, they are alcohol based and bleed through paper and fabric quite easily. Specific papers are recommended for coloring, and even with them we color on top of scrap paper or a protected surface.
I was very light handed in my color application and did not have color bleed through to the paper inside. The woman across from me colored intensely and her result was just as attractive while entirely different.

Colors used were RV10, RV13, RV14, V04, V06, B00, B02 and B05 for the flowers with Y18 centers.  Leaves were YG01, YG03, YG05, YG25 and G17.
Almost invisible in this photo is B0000 in the background around the flowers, leaves and stems.

This morning I experimented with coloring ribbons bows from a package of embellishments. The pink one has two shades of pink. On the middle one, I used blue and colorless blender and colored the 'pearl' center. If you weren't aware of this, clear rhinestones can be colored any shade you like. The rhinestone centers in the purple flowers of the gift bag above were clear until I used the yellow marker. On the bow to the right, I colored the edge of the ribbon purple and used blender to pull a hint of color into the body of the ribbon. I drew dots on the pearl.

Monday, June 24, 2013

3D Paper Cupcake Frame

If it wasn't for the last minute, many crafters would never get things done, right?

Yesterday I wrote about the teal ombre cake for my great niece. I could have made this frame weeks ago when I first bought the kit from my local scrapbooking store but that would have made too much sense....instead I rushed to put it together while having cake baking angst.

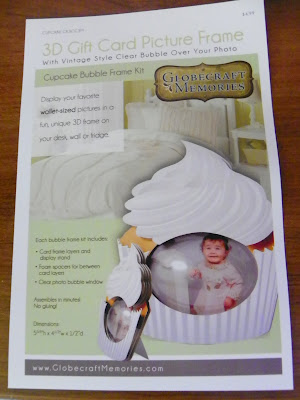
This is the kit that I bought
It is called a Cupcake Bubble Frame Kit from Globecraft Memories. Unfortunately I cannot find an online link to this kit but if you search for it online, there is at least one blog entry showing the frosting decorated that would have been a really cute idea if I had started this earlier.

With the birthday girl's favorite color being teal I decided to play with a photo of her in Picasa and altered the image to 'Neon' using teal as the color.
Here is the image cropped to fit inside the cupcake bubble. On the card next to it, I drew a replica of the cupcake and colored it with Copic markers. I cut it out and added it to fun paper on a card that informs here that her gift from me is a shopping spree at a scrapbooking store.

Sunday, June 23, 2013

Ombre cake

I have seen many ombre cakes on Pinterest and decided to make a four layer cake for a family birthday celebration. I decided to go with four shades of teal and use two boxes of white cake mix.

When it comes to cake mixes, I am a fan of Duncan Hines but when I shopped, the store didn't have Duncan Hines white, I bought Betty Crocker mixes instead. Here are the tinted batters (I used Teal by AmeriColor) in the pans.

I should have photographed the layers on the cooling racks. I have never had such flat layers in all my years of baking. I had been expecting to trim almost half of each layer to limit the overall height of the cake to fit within my cake carrier, but there really wasn't much to trim, just the slight crowning that is typical. Here are the trimmed parts on a plate, showing the baked colors.
I used an oven thermometer to check the accuracy of my oven temp. I don't know if my results are typical of Betty Crocker mixes, typical of just white cake mixes that use the egg white but not the yolk, if I had two "bad" boxes of mix, or if something unrelated was to blame.

Normally I make my own buttercream frosting and would have piped large stars or swirls in rows of deepening color on the cake. I did make one batch of buttercream and used it between layers and thinned as a crumb coat, but the frosting you see here is canned frosting. Some days interruptions, bad luck in the kitchen and weather conspire to make short cuts necessary if one desires to maintain some degree of sanity and get to a party on time. I tinted canned vanilla icing four shades of teal, the lightest being the top of the cake which doesn't look much different in this photo. Canned frosting doesn't pipe well so I just painted bands of color onto the cake with a small spatula and blended away.
Not what I had in mind, but not atrocious. How's that for a rousing endorsement?

Here is the cut view of the ombre cake which the birthday girl loved.
All's well that ends well for the birthday event, but I am still left wondering why the layers baked so flat.