Friday, July 26, 2013

Cue the Super Heroes theme music!

With thanks to This Blog Post and the links within that post, I made Batman apparel for my grandson, the Prince of Sweetness who is also known as daddy's Buddy, mommy's Peanut, and Uncle Billy's Bug. Think George Alexander Louis, Prince of Cambridge has a lot of names? Any first born child/grandchild/niece or nephew does.

Our grandson was happy to see the Batman logo but not interested in wearing the tabard, mask or gauntlets. He is only three so there is still time for my genes to make an appearance and the love of costuming appear.

I now wish I had taken more time getting these photos, but between these and the photos on the above link, you can see things well enough.  Here is the tabard, mask and gauntlets.
 
I used premium weight craft felt for all that is black, and regular weight in yellow. The felt was left over from the playhouse project (shown here on my other blog). The tabard began as a 14" x 36" rectangle with an oval cut out for the head, and a slit cut down 4" in the back. No button or tie is necessary to close the neckline, this is just for play or possibly Halloween. Ribbons (12" pieces) were stitched at the sides to hold the tabard around a crime fighting body. 
The mask is a double layer of felt with elastic stitched in place. Other than stitching the ribbons and elastic because of the pull on these areas, the rest of these pieces could be glued, but I can stitch this stuff faster than glue would dry. Felt is forgiving and doesn't need hemming so this was a quick project. 
The gauntlets were designed to fit a child of 4-9. I don't know how this age range was determined. My grandson is very big for his age. I cut the gauntlet a little smaller and these were none too big on him, especially on bare arms on a warm summer day. It wasn't so much the width of the arm as it was getting his hands through the opening. I may cut these a little shorter at the narrow end to make the opening larger.
 I didn't time myself making these pieces, but I think the whole project took me less than 90 minutes, and that included getting supplies out and cutting templates for the logo and an oval for the neck opening.
 

Hmmm, I wonder if there is design online for a Wonder Woman version? A mature Wonder Woman. Very mature. Grandmotherly.

Thursday, July 18, 2013

Painting on glass

This is my first attempt at painting on glass using Martha Stewart gloss paint for glass and also her adhesive stencils.

No staging for this photo, the bottle was hot from the oven. The blue towel behind it
 is to make the stencil visible and hide the knife block on the counter.
The bottle is from a Starbuck's cold drink. I purposely chose to place the doily stencil on the bottle so that the top of it was where the bottle began narrowing for the neck. It didn't go badly but a first attempt would have been better on a flat surface. Scratch that...it doesn't have to be flat, just not a change in size. The stencils are silk screen style and thin so they easily bend around a bottle.

Directions that I saw online suggested using a foam stencil dauber. I didn't have one but I did have a foam brush. I may have pushed the brush a bit instead of a daubing and therefore smeared a bit of paint under the stencil or pushed the stencil itself.

Here is a smaller image on the back of the bottle. Not bad, but still not perfect.
The paint would have cured on its own in 21 days or could be baked in the oven. I chose that method as I don't know where this bottle is going to rest for the next three weeks and I wanted it cured as soon as possible. I will hand wash it in a few days and see if holds up well.

The stencil is Martha Stewart Crafts #33244 Doily Lace Adhesive Silkscreen. There are five designs to the package. The paint is Martha Stewart Crafts Glass Paint Gloss #33120 Wedding Cake.

I will try a transparent paint next. My goal is to decorate the underside of plain glass plates and use them to serve cookies, cakes, etc. when I give baked goods away. The plates can be part of the gift without breaking up a set of dishes that I use here at home and hopefully will bring a smile of remembrance to the recipient long after the cookies are gone. The same will be done for flowers in bottles like the one above or the collection of plain vases from florists over the years.

Tuesday, July 16, 2013

Cards

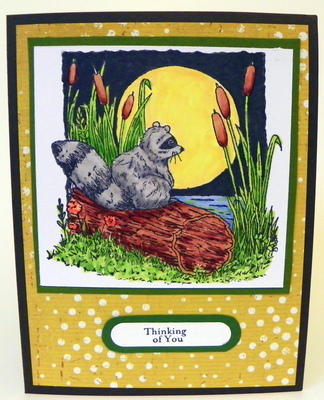
Except for the raccoon card, one might think today's theme is alcohol.

The raccoon image is Moonlight Raccoon by Inky Antics. Copic markers used were Y02, Y23, YG03, YG05, YG17, E13, E15, E17, E18, B91, B93, B95, C1, C3, T4 and C8 (background).
This image is Tipsy, by Kathleen Francour, part of the Frou Frou line. Copics used were RV00, RV04, RV14, RV66, E00, E000, E11, R20, and BG0000 around the entire image. It doesn't show in the exterior photo but can be seen on the interior page.
 Both of these cards were part of a workshop at a local scrapbook store. The raccoon card really isn't "me" but I'm sure it will be used eventually.
 
The next group of cards is from a kit offered by Archiver's. For details on what is included in the kit, click here. I've made two of each of these cards and plan to make wine bottle gift tags. I like the pack of papers and will use the remainder in many other projects.
I haven't stamped on paper with such obvious prints before with stamps that had detail such as the wine bottle label or the stacked glasses. It didn't occur to me to do so, probably because I color images so often. I like the look though, and will do this again.  


Sunday, July 14, 2013

Architectural Vest

I made a vest for my dear daughter-in-law. The name of the pattern is Architectural Vest, designed by Lisa Hoffman and available at the Tahki Stacy Charles website on in the pattern book Intermix by Thaki Yarns.

This is the vest as shown in the pattern
The yarn is Cotton Classic Lite, a 100% cotton yarn by Tahki.

These two photos were rushed and not taken in good light conditions, but they show the front and back of the finished vest.

 This photo was taken in natural daylight and shows the color more accurately.
The pattern was not difficult and my only complaint was the size of the printed chart in the pattern book. Knitters younger than I am in my knitting group also thought the chart was minuscule and difficult to read. Normally I would have scanned it, enlarged and printed it here at home, but my printer/scanner and computer had a spat and weren't communicating. Ok, that isn't exactly true...I had a new router from Uverse and didn't know how to readdress the printer until a few hours after making my own charts using Excel spreadsheets. A blog buddy asked why I didn't go to an office supply store and have the charts copied there. I don't know if reason number one was that I was tackling this at odd hours while still in my nightgown or if reason number two was more accurate, that being that I just plain didn't think of going there.  photo doh_zpse71add90.gif I knew from past experience that FedEx/Kinko's sometimes gives you grief over copying printed material even if it is only for personal use.

Saturday, June 29, 2013

A Castle Wall

A very good friend of mine is involved in her church's Vacation Bible School every June. Her assignment is to read stories (lessons) to preschoolers. The first year that I helped by creating a backdrop, the theme was a ranch and I was asked to paint a horse's head on a poster board. You should be relieved that I don't have a photo of that to share.

A few years back, the theme was Crocodile Dock. I was asked to paint a fishing shack in a bayou, seen here.  Another year I was asked to make snake hand puppets. I saved the prototype which has become one of our grandson's favorite things to play with while here. I don't have a photo of the puppet as originally created, but here is a recent photo of the snake with a pacifier.

This year, the theme was Kingdom Rock. My friend, with an abundance of faith, asked if I would make a castle wall backdrop. With a fireplace. Painted on a flattened refrigerator carton.

Do you know how big a flattened refrigerator carton is? It is huge! Here it is in my living room, painted primer gray.
It was folded and placed flat on the floor to measure and draw pencil lines to indicate where cement blocks would be drawn with a wide tip black marker.
 
I am lucky to have a sewing/craft room, but it isn't big enough to accommodate a project of this size and allow perspective for photographing.
Originally, my friend only wanted three panels done, but once you have a permanent crick in your neck, why not do all four? Here are three panels partially done and the beginnings of the fireplace.
I'm not thrilled with the fire and the glow that I tried to created but I doubt pre-schoolers are picky critics. If they are, I still have a snake that will defend me.
In case you ever find yourself needing to create the illusion of a block wall, here is the cheater's guide:
 
Decide the size of your blocks, in my case, 8" tall by 12" wide. Measure and mark with a pencil on a surface that has been painted the desired color of your wall. My friend and her daughter used primer gray before bringing the cardboard to me.
 
Use a yardstick and a broad tip marker to create the blocks. Take the hard square-ness off of the block corners by making a "Y" on your lines at the top joins and an upside down "Y" at the bottom with your marker. It doesn't have to be exact.
I used disposable foam brushes (I buy them by the bag for messy work) with very little paint (dry brush technique) to make a black line down the left side and across the bottom of each block for shading, then did the opposite sides in white for highlighting. It was a quick detail that gave the blocks some dimension.
 
Next year, I hope the theme is imagination. Close your eyes children. Close them tight. See whatever you want to see while I read you the story of two friends. One wonders how she gets drawn into projects that she feels is over her head.  The other has faith that with a foam brush, acrylic paints and a marker, her friend can make anything she asks.


Thursday, June 27, 2013

Copics on canvas and on ribbon

I am relatively new to Copic Markers but already addicted. My first class was last September. I admitted my addiction here on my other blog. I would probably be further along on the learning curve if I didn't have other crafts competing for Copic time and oh yes...the occasional chores like laundry, housecleaning and cooking interrupt me too.

A class at my local scrapbooking store introduced coloring on something besides paper. We worked on a canvas board and a small muslin gift bag. The instructor had the board and bag stamped and ready for us before class. Both needed to be thoroughly dry before coloring. I believe she recommends overnight drying when fabric is involved. I don't know if the fabric would be washable or not, but for a small gift bag that wouldn't be a concern. I wouldn't plan to decorate clothing with anything but tried and true fabric paint.

Here is the canvas designed to go into a 4x6 frame. The bow and ribbon on the left were supposedly a design element but I would have preferred the stamped image to be centered and skip the ribbon. This particular image wouldn't be my choice anyway, so I doubt it will ever be framed and used.
The muslin gift bags were purchased in bulk from an online source. A square of Copic paper was inside the bag as we colored. For those unfamiliar with Copics, they are alcohol based and bleed through paper and fabric quite easily. Specific papers are recommended for coloring, and even with them we color on top of scrap paper or a protected surface.
I was very light handed in my color application and did not have color bleed through to the paper inside. The woman across from me colored intensely and her result was just as attractive while entirely different.

Colors used were RV10, RV13, RV14, V04, V06, B00, B02 and B05 for the flowers with Y18 centers.  Leaves were YG01, YG03, YG05, YG25 and G17.
Almost invisible in this photo is B0000 in the background around the flowers, leaves and stems.

This morning I experimented with coloring ribbons bows from a package of embellishments. The pink one has two shades of pink. On the middle one, I used blue and colorless blender and colored the 'pearl' center. If you weren't aware of this, clear rhinestones can be colored any shade you like. The rhinestone centers in the purple flowers of the gift bag above were clear until I used the yellow marker. On the bow to the right, I colored the edge of the ribbon purple and used blender to pull a hint of color into the body of the ribbon. I drew dots on the pearl.

Monday, June 24, 2013

3D Paper Cupcake Frame

If it wasn't for the last minute, many crafters would never get things done, right?

Yesterday I wrote about the teal ombre cake for my great niece. I could have made this frame weeks ago when I first bought the kit from my local scrapbooking store but that would have made too much sense....instead I rushed to put it together while having cake baking angst.

This is the kit that I bought
It is called a Cupcake Bubble Frame Kit from Globecraft Memories. Unfortunately I cannot find an online link to this kit but if you search for it online, there is at least one blog entry showing the frosting decorated that would have been a really cute idea if I had started this earlier.

With the birthday girl's favorite color being teal I decided to play with a photo of her in Picasa and altered the image to 'Neon' using teal as the color.
Here is the image cropped to fit inside the cupcake bubble. On the card next to it, I drew a replica of the cupcake and colored it with Copic markers. I cut it out and added it to fun paper on a card that informs here that her gift from me is a shopping spree at a scrapbooking store.