Showing posts with label Cards. Show all posts

Sunday, September 22, 2013

Smocked Bishop dress and a card

A wonderful young woman with a love of old fashioned needle arts is in my knitting group. She recently gave birth to a daughter and while pregnant, commented on her love of smocked garments which aren't prevalent in this area, in this era.

Once upon a time I would have bought Imperial Batiste and gathered the fabric on my own smocking pleater.
Quality fabric is important when running it through a pleater. Joann's is fine for many things, but this level of quality isn't found in their yard goods. I suspect my long unused pleater may need new needles before tackling another project and they would need to be ordered. The needles are fine and if you run roughshod through the process of turning the pleater wheel, they will crunch and break. Not good, not good at all.

Thank goodness I discovered Meredith's Closet, an Etsy shop of ready to smock items. I order a 12 month size dress in a color called Butter. I pulled out my stash of long unused smocking designs which are called 'plates' rather than patterns. This is not the design I used, but is a sample of what a plate looks like.
Before I could begin to smock, the center of all those pleats had to be found. Each pin represents 10 pleats. The threads you see are gathering threads, usually quilting weight threads that are tied off on either side of the area to be smocked.
Here you see the pleats both scrunched up and spread out. The pleats should slide easily on the gathering threads. Smocking is worked from the left side of the garment to the right, but the needle enters the top of the pleat from right to left.
Reading the plate came easily to me when I learned to smock because I was accustomed to counted cross stitch and knitting charts.

The color is a bit off (too strong) in this photo, but shows the completed dress with a deep hem which is traditional in these dresses.
Here is a close up of the smocking itself. I was pleased with how it turned out, and more importantly, the mommy who received this dress was very happy.
The that I made to accompany this gift was another tri-shutter card. I seem to be stuck on them lately but they have been turning out well and use a variety of cute scraps and embellishments.


Monday, August 26, 2013

Tri-shutter card

If you have a scoring tool and a paper cutter, this project goes really fast. The card could still be made without them. A great tutorial and list of sizes to cut the various papers is here on Our Daily Bread Designs blog. I'm already planning to make this again using photos of the card's recipient and their hobbies or loved ones in place of the printed paper. Wouldn't a photo of the bride and her flowers be pretty on an anniversary card? Or sport photos and movie characters be cute on a young boy's birthday card?


Tuesday, July 16, 2013

Cards

Except for the raccoon card, one might think today's theme is alcohol.

The raccoon image is Moonlight Raccoon by Inky Antics. Copic markers used were Y02, Y23, YG03, YG05, YG17, E13, E15, E17, E18, B91, B93, B95, C1, C3, T4 and C8 (background).
This image is Tipsy, by Kathleen Francour, part of the Frou Frou line. Copics used were RV00, RV04, RV14, RV66, E00, E000, E11, R20, and BG0000 around the entire image. It doesn't show in the exterior photo but can be seen on the interior page.
 Both of these cards were part of a workshop at a local scrapbook store. The raccoon card really isn't "me" but I'm sure it will be used eventually.
 
The next group of cards is from a kit offered by Archiver's. For details on what is included in the kit, click here. I've made two of each of these cards and plan to make wine bottle gift tags. I like the pack of papers and will use the remainder in many other projects.
I haven't stamped on paper with such obvious prints before with stamps that had detail such as the wine bottle label or the stacked glasses. It didn't occur to me to do so, probably because I color images so often. I like the look though, and will do this again.  


Monday, June 24, 2013

3D Paper Cupcake Frame

If it wasn't for the last minute, many crafters would never get things done, right?

Yesterday I wrote about the teal ombre cake for my great niece. I could have made this frame weeks ago when I first bought the kit from my local scrapbooking store but that would have made too much sense....instead I rushed to put it together while having cake baking angst.

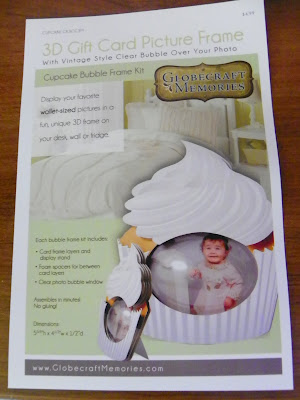
This is the kit that I bought
It is called a Cupcake Bubble Frame Kit from Globecraft Memories. Unfortunately I cannot find an online link to this kit but if you search for it online, there is at least one blog entry showing the frosting decorated that would have been a really cute idea if I had started this earlier.

With the birthday girl's favorite color being teal I decided to play with a photo of her in Picasa and altered the image to 'Neon' using teal as the color.
Here is the image cropped to fit inside the cupcake bubble. On the card next to it, I drew a replica of the cupcake and colored it with Copic markers. I cut it out and added it to fun paper on a card that informs here that her gift from me is a shopping spree at a scrapbooking store.