Showing posts with label Copic Markers. Show all posts

Saturday, July 27, 2013

Copic coloring: matte metal finishes

I am still a novice when it comes to Copic markers, but I am happily learning more with each class. I've recently been taking monthly classes at Mary Maxim's retail store in Port Huron, Michigan. I come home from there feeling like I've learned all that was expected and then some.

Last week we spent the morning class working on skin colors and the afternoon was focused on matte metal finishes.  I'll show you the morning's result first:
The color in this photo is off a bit, probably because of the lack of natural light in the room when I photographed this. The stamped image is from Art Impressions and is called "Staying' Afloat". I love the girlfriends line of Art Impressions stamps. Besides learning what colors to use for various skin tones, this was the first time I used a Gelly Roll pen to make the white stars, stripes on the yellow bathing suit and designs on the purple one. Not showing well in this photo are white pencil lines (Prismacolor pencil) to make the water look like the ladies are floating in a swimming pool. Fun stuff!

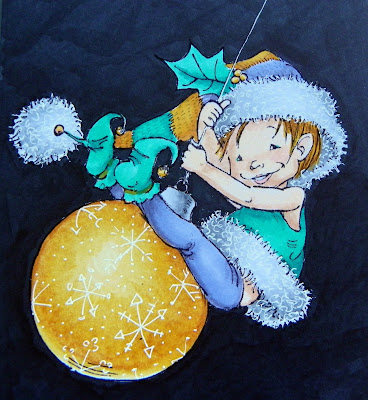
The afternoon class used Penny Black & Mom Manning's stamps "Little Elf Finn" and "Little Elf Mim" We didn't use traditional Christmas colors because some in the class had done elves last fall in those colors. Our focus wasn't their clothing anyway, it was making a sphere look like a sphere and creating matte metal colors.

While these elf images are very cute, I don't know when I will get around to using them so they may hang around my craft room as examples. I took it upon myself to color the background black on the boy elf. I don't see myself fussy cutting the image, but I may do a rough cut now that the background is black. If I were to leave it the size that it is, I would need to blend the block more so that you don't see strokes. Since I'm not sure what I may do with it, I'm conserving ink.

And being lazy.

I wouldn't have known what colors to use to achieve the gold finish (Y21, YR24 and YR27) or which grays to use for the silver (N0, N2 and N4). We used the Gelly Roll pen again to decorate the ornaments and add fuzziness to the fur trim on their clothing. Tiny hash marks, made with a Copic Multiliner, on their hats indicate a knit texture.

What a cowinkydink...I'm listening to Oldies Radio and "Color My World" just came on! I love Chicago and am really loving Copics!

 photo signature_22.gif

Tuesday, July 16, 2013

Cards

Except for the raccoon card, one might think today's theme is alcohol.

The raccoon image is Moonlight Raccoon by Inky Antics. Copic markers used were Y02, Y23, YG03, YG05, YG17, E13, E15, E17, E18, B91, B93, B95, C1, C3, T4 and C8 (background).
This image is Tipsy, by Kathleen Francour, part of the Frou Frou line. Copics used were RV00, RV04, RV14, RV66, E00, E000, E11, R20, and BG0000 around the entire image. It doesn't show in the exterior photo but can be seen on the interior page.
 Both of these cards were part of a workshop at a local scrapbook store. The raccoon card really isn't "me" but I'm sure it will be used eventually.
 
The next group of cards is from a kit offered by Archiver's. For details on what is included in the kit, click here. I've made two of each of these cards and plan to make wine bottle gift tags. I like the pack of papers and will use the remainder in many other projects.
I haven't stamped on paper with such obvious prints before with stamps that had detail such as the wine bottle label or the stacked glasses. It didn't occur to me to do so, probably because I color images so often. I like the look though, and will do this again.  


Thursday, June 27, 2013

Copics on canvas and on ribbon

I am relatively new to Copic Markers but already addicted. My first class was last September. I admitted my addiction here on my other blog. I would probably be further along on the learning curve if I didn't have other crafts competing for Copic time and oh yes...the occasional chores like laundry, housecleaning and cooking interrupt me too.

A class at my local scrapbooking store introduced coloring on something besides paper. We worked on a canvas board and a small muslin gift bag. The instructor had the board and bag stamped and ready for us before class. Both needed to be thoroughly dry before coloring. I believe she recommends overnight drying when fabric is involved. I don't know if the fabric would be washable or not, but for a small gift bag that wouldn't be a concern. I wouldn't plan to decorate clothing with anything but tried and true fabric paint.

Here is the canvas designed to go into a 4x6 frame. The bow and ribbon on the left were supposedly a design element but I would have preferred the stamped image to be centered and skip the ribbon. This particular image wouldn't be my choice anyway, so I doubt it will ever be framed and used.
The muslin gift bags were purchased in bulk from an online source. A square of Copic paper was inside the bag as we colored. For those unfamiliar with Copics, they are alcohol based and bleed through paper and fabric quite easily. Specific papers are recommended for coloring, and even with them we color on top of scrap paper or a protected surface.
I was very light handed in my color application and did not have color bleed through to the paper inside. The woman across from me colored intensely and her result was just as attractive while entirely different.

Colors used were RV10, RV13, RV14, V04, V06, B00, B02 and B05 for the flowers with Y18 centers.  Leaves were YG01, YG03, YG05, YG25 and G17.
Almost invisible in this photo is B0000 in the background around the flowers, leaves and stems.

This morning I experimented with coloring ribbons bows from a package of embellishments. The pink one has two shades of pink. On the middle one, I used blue and colorless blender and colored the 'pearl' center. If you weren't aware of this, clear rhinestones can be colored any shade you like. The rhinestone centers in the purple flowers of the gift bag above were clear until I used the yellow marker. On the bow to the right, I colored the edge of the ribbon purple and used blender to pull a hint of color into the body of the ribbon. I drew dots on the pearl.

Monday, June 24, 2013

3D Paper Cupcake Frame

If it wasn't for the last minute, many crafters would never get things done, right?

Yesterday I wrote about the teal ombre cake for my great niece. I could have made this frame weeks ago when I first bought the kit from my local scrapbooking store but that would have made too much sense....instead I rushed to put it together while having cake baking angst.

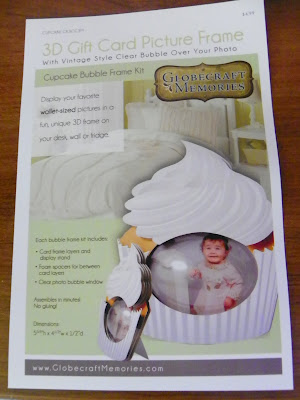
This is the kit that I bought
It is called a Cupcake Bubble Frame Kit from Globecraft Memories. Unfortunately I cannot find an online link to this kit but if you search for it online, there is at least one blog entry showing the frosting decorated that would have been a really cute idea if I had started this earlier.

With the birthday girl's favorite color being teal I decided to play with a photo of her in Picasa and altered the image to 'Neon' using teal as the color.
Here is the image cropped to fit inside the cupcake bubble. On the card next to it, I drew a replica of the cupcake and colored it with Copic markers. I cut it out and added it to fun paper on a card that informs here that her gift from me is a shopping spree at a scrapbooking store.